Steve and I get asked a lot about how we use Scrivener to write our books. And it all starts with the research and outlining phases.
I’m going to focus mainly on how I use Scrivener to outline a non-fiction book, but if you want to see how Steve uses Scrivener to outline his novels, you should check out the 4-Part Story Structure Scrivener template for that. You can get free access to that as an Author Basics Member 🙂
Below I’m going to take you through my entire process and how Scrivener plays a big part in how my book begins to take shape.
As it happens, I’m at the beginning stages of writing a new non-fiction book, so you get to see the actual book take shape.
Watch the video below first, then read about the process below it, screenshots included!
How I Use Scrivener to Outline My Books
Now that you’ve watched the video, it’s time to break down this process further and look at it a little more in detail.
So let’s start at the beginning.
My Book Outlining Process
Step #1: Mindmap
As I mentioned in the video, my book starts out as a mindmap. I do this because it helps to get all of my thoughts out of my head and I find the physical process of putting pen to paper gets my creative juices flowing even more.
I generally take about 30-60 minutes to do the initial mindmap, then I’ll leave it for 24 hours and then come back to it, to see if more ideas have come to fruition.
Sometimes, in that 24 hour period, more ideas will come, which is why I have my mindmap up on the wall in plain view so that I can come back and add ideas to it whenever I want.
This part of the process is key to me being able to take the next step, without it I find myself floundering and struggle to write anything of value.
Figure out what you key first step is and ensure you do it for every book you write.
Step #2: Grouping ideas
Once I’ve finished mindmapping, it’s time to come up with some loose chapter headings or groups. I tend to look at my mindmap and identify similar ideas. I’ll label them with numbers or circle them with different colours so I can quickly see the similar ideas.
From there, I’ll then write down some group headings and then the process starts to move into Scrivener…
Step #3: Setting up Scrivener
I’m a bit of an organisation freak and I love putting things in the right place and utilising colours to make them easy to find. This definitely is reflected in the way I use Scrivener to create the outline of my book and later, the actual writing part.
Below is a screenshot of how I set up Scrivener initially. You’ll see I’m using the corkboard view. This is because I am a visual person and it helps me to see the initial flow of my book idea right from the start.

It also means that I can move ideas around as needed, and I prefer to do this in the outlining phase, although you can move chapters around once the book is written, it can get a little tricky if you’re doing opening and closing paragraphs that mention pre and post chapters. Definitely doable, but not my preferred choice.
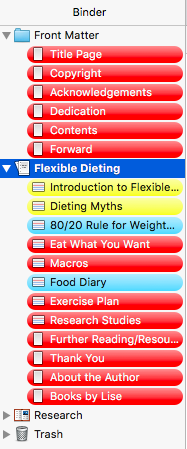
I use colours to highlight where a document is at in the writing stage. So when I input my outline into Scrivener, everything is labelled “to-do” and I show the label colours in the binder, so I can quickly see where I’m at in the process.
As I move through the writing phase, I’ll change the label to in-progress or first draft and the colours will change accordingly.
Step #4: Outlining on Steroids
Yep, we are still in this phase! Once I’ve got Scrivener all set up, it’s time to add a little meat to my book. This is where the magic of having a mindmap comes in handy!
Now, I’ll jump into each chapter heading (although these are not set in stone yet) and write a brief paragraph on what I’m going to write about here.
This is when I’ll also pull in research and add it to Scrivener, adding a note in the inspector about what the research relates to. I will often assign them a number so that it’s easy for me to figure out which chapter they belong to.
If I have website links, I’ll add them to the notes inspector for the chapter as well.
This part of the process really helps for when it’s time to write the book. By having these short paragraphs, it makes sitting down to write about each chapter a lot easier, because I’m not starting at a blank page, trying to figure out what to write!
Once I’ve completed this part of the phase, I’ll let the book sit for 24-48 hours as my subconscious mulls everything over. Once that time has passed, it’s time to get serious, plant my butt in the chair and start writing.
Step #5: Writing the Book
At this point, I’m scheduling writing time into my calendar each day to sit down and write for at least an hour a day. If I get into a really good groove with my writing, I let myself write for another hour. This works really well for me.
I don’t typically schedule this for first thing in the morning, I tend to schedule it for around 10am, once all the morning stuff has gotten out of the way, I can then sit down and write, uninterrupted.
Typically, I can type about 1500-2000 words an hour, so this makes this schedule work really well for me, and it’s how I was able to write 7 books in 7 weeks at the beginning of 2015!
Scrivener is one of the most powerful tools at our disposal and for the price, you really can’t beat it. Not only can you outline and write your books in it, you can also use it to plan out content for your blog, create a content calendar plus so much more. And when you’re ready to format your book, Scrivener makes it easy, even if you’re using a third-party program like Vellum.
If you’re not using Scrivener, then what are you waiting for? Go and check it out now!
If you need help outlining your book, check out the 9 Day Novel: Outlining